
Get your ReviewGrower account fully operational and ready to start collecting reviews. In this guide, you’ll
- Create your account
- Connect your existing review platforms
- Configure essential settings
- Add your first customer contacts
Phase 1: Account Creation and Setup
Step 1: Sign Up
- Navigate to the ReviewGrower pricing page:https://reviewgrower.com/pricing/
- Enter your personal information:
- First name
- Last name
- Phone number
- Click “CONTINUE” to proceed

Step 2: Business Information
After adding your personal information, the next step is adding your business information.
- Enter your business details:
- Business name:
- You can add the business from Google or add it manually
- Timezone
- Select your business timezone from the dropdown
- Business name:
- Click create an account, and on the next page, you’ll be asked to add the following information.
- Company Name
- Country
- Address
- City
- Stat
- Zip code
- Timezone
- Click “Create Account” one more time.
- After successfully creating your account, you’ll see a confirmation message.
- Click the “CONTINUE TO DASHBOARD” button to access your ReviewGrower dashboard and set up your review management system.

The account setup page will display once the account creation process is complete. This is the list of tasks you need to complete to get your Review Grower account ready to roll!

Step 3: Account Set Up – Connect your Review Platforms
The basic information was filled in when you created your account, and now the next task on the list is connecting your review platforms. We have more than 50 review platforms available to integrate. To get started:
- Click the “Connect” Blue Button, and the active connections page will show.

- Choose your platform: Find the review site you want to connect to and click the blue “Connect” button below its icon.
- Enter your review profile URL: Make sure to use the correct URL format for your chosen platform.
- Example formats will display for each platform.
- Save and sync: Click Save, and the system will automatically connect the review profile and pull in your reviews.
- This may take a few minutes, depending on how many reviews you have

- Add more platforms (optional): repeat steps 2-4 for any additional review sites
- Finish the review platforms setup: once you have added all the desired connections, click the blue “Save” on the lower right corner to complete this step of the process.
Step 4: Configure Account Settings
After connecting your review platforms, you’ll need to configure your account details.
- Click the Add Blue Button to open the settings page
- Customize your information
- Business name: If you want, you can edit it.
- Email address: Add your preferred email
- Date format: Make sure to set up your preferred date format
- Optionally, you can also add your business logo
- Once you are satisfied with the changes, click “save changes” to apply your settings.
- Then, confirm and continue by clicking the “Save” blue button at the lower right corner to finalize and move to the next step.
Step 5: Add Initial Contacts
- You can add your contacts manually by clicking the “+ add new contact” blue button and filling in the information.
- ⚠️ You can add any additional fields you desire by clicking + add field.

- When you have added all the information, click the “Save” blue button.
- You can also add contacts by importing them using a CSV file, webhook, review funnel, or embedded link to a form. Will dive deeper into the details later.
- Once you have added all the contacts you want to add, click the Save blue button below your contact list.
Phase 2: Review Collection
After completing the “get started: section, the next step is building your review collection system with smart funnels that guide customer feedback and automated campaigns that systematically request reviews. This phase transforms your ReviewGrower account into an active review generation machine.
Step 1: Create a review funnel
A review funnel helps you manage customer feedback and increases the chances of receiving positive reviews.
- To start the process, go to the Review Funnel step and click the blue “Create” button.

Step 2: Choose Your Review Funnel Layout
- Configure the funnel pages: Start by designing your funnels
- Select your preferred layout. On the right side, you can access the preview for the reviews and feedback pages.

Step 3: Customize Design
- The design tab allows you to customize the visual appearance of your funnel.
- Logo: Upload the business logo that will appear at the top of the funnel
- Header: Choose the text color that shows up well against your header background
- Background: Select the main background color; generally, white or light grey works best
- Text Color: Choose the color for regular text; usually, the text is dark to favor readability
- Footer: Pick the background color for the bottom section
- Footer Text: Choose text color for the footer area
- Header alignment: Left, center, or right alignment for header content
- Footer alignment: Left, center, or right alignment for footer content
- Custom CSS: The Custom CSS section is for advanced users only – skip this unless you have web development experience.
Step 4: Configure the Settings
- Next is the general settings. Verify the following, and edit if needed.
- Brand/Business Name
- Verify the review profile URL
- Font Family
- Set Up the Funnel Content
- Header Subtitle: Write a friendly question that asks customers to rate their experience. Keep it simple and conversational. Below you have some examples.
- How was your experience today?
- Would you recommend us to a friend?
- Rate your visit with us!
- Footer Text: Add information that appears at the bottom of every screen. To customize this section, you can use the formatting tools (Bold, Italic, Underline, Links, Images). Keep it brief but helpful by adding:
- Business contact information: Questions? Call (555) 123-456
- Website link: Visit us at yourwebsite.com
- Business hours: Open Monday-Friday 9 AM-6 PM
- Location: Located at 123 Main Street, Your City
- Positive Feedback Text: Write a message encouraging satisfied customers to leave public reviews. Check out the following examples:
- We’re thrilled you had a great experience! Please share it:
- Loved our service? Tell others about it:
- Help others discover us by leaving a review:
- Negative feedback text: Write a welcoming message for private feedback. Consider the following phrases:
- We’d love to hear how we can improve:
- Help us serve you better – share your thoughts:
- Your feedback helps us grow:
- Negative Feedback Confirmation: Write a thank you message that customers can see after they submit feedback.
- Thank you for your feedback! We’ll review it and improve our service.
- We appreciate your input and will follow up with you soon.
- Customize Feedback Form Labels: Set clear labels for the information you want to collect:
- First Name: “First Name” or “Your Name”
- Email: “Email Address”
- Phone: “Phone Number (Optional)”
- Feedback Box: “Tell us what happened…” or “Share your experience…”
- Submit Button: “Send Feedback” or “Submit”
- Header Subtitle: Write a friendly question that asks customers to rate their experience. Keep it simple and conversational. Below you have some examples.

Step 6: Add Review Sources
- Feed: Here, you can add Additional Review sites if you want.
- Click “+ Add Source” to add more review platforms
- Add the direct links to your business pages on Facebook, Yelp, TripAdvisor, and industry-specific sites.
- Add 3-5 platforms that your customers use
- Test all links before adding them to ensure they work correctly
Step 7: Test and Launch
- Test and Launch Your Funnel The “View Funnel” blue button offers you a preview and helps test your funnel before going live
- Check that all messages, links, and flows work correctly
- Save Your Funnel Click to save all changes and make your funnel active
- Must save before sharing with customers
- Expand your reach with the QR Code Click to download a QR code linking to your funnel
- You can add it to receipts, business cards, or table displays
- Customers scan with their phone to access your review request
- Make sure to click the “save” blue button on the right side of the page.

⚠️ Pro Tips:
- Use warm, conversational language throughout
- Keep all messages short and easy to read
- Test by reading everything from a customer’s perspective
- Save your changes and preview the funnel before going live
Your content should feel welcoming and make customers comfortable sharing both positive and negative feedback.
Step 8: Set up a Review Campaign
⚠️ With RG, users can run more than one campaign. Whereas before, they were only able to add one.
Click the “Create” blue button.

Step 9: Add steps to the campaign
- Click “+” to add as many steps as needed
Step 10: Select step type (Email, SMS, Wait)
- For Email steps:
- For SMS steps:
- Create message text
- Include the review funnel link
- For Wait steps:
- Set duration (hours, days)
Step 11: Identify the timing modules in your workflow
In your builder workflow, find the “wait” modules
- Click on or hover over until you see a pencil icon and click
- The “delay” window will open
Step 13: Edit as needed
- Edit the action name (e.g., “Wait 1 Hour”), and then customize the waiting periods as you wish
- Click the “save” blue button for changes to apply
Step 14: Configure all the timing steps of your workflow
- Scroll down to see all the timing steps in your flow
- Make sure to edit all of them according to your timing preferences
- Once ready, click the “save changes” blue button at the bottom of the page for the changes to apply.
Phase 3:Advanced Features
Transform your collected reviews into powerful marketing tools that build trust and drive conversions. Create website widgets and automated social media posts that showcase your positive reviews across all platforms.
Step 1: Review Widgets
- Click the “Create” blue button.

Step 2: Select widget type
- The options include:
- Carousel
- Grid
- List
- Floating/Hover
- Popup

Step 3: Configure general settings
- The next step is deciding the following:
- Number of reviews to show
- Platforms to include
- Minimum star rating filter
- Sort order (newest, highest rated)
Step 4: Customize the appearance of your widget
- Customize how your widget looks
- Colors (background, text, accents)
- Font styles
- Layout options
- Borders and shadows
Step 5: Customize Header
- Header alignment
- Space between the header and the feed
- Title (Font Size, Color)
- Subtitle (Font Size, Color)
- Add “Write a Review” button (optional)
Step 6: Feed
- Padding between reviews
- Columns
- Reviews per page
- Review Box
- Review text
- Text toggle
- Pagination
- Sources

Step 8: Filters
Ensure you set up the following elements at htis point.
- Reviews Sorting
- Minimum rating
- Filter by keywors
⚠️ Custom CSS is for (advanced users), you can skip this step.
Step 9: Save your widget
- Preview the widget
- Save the widget by clicking the “SAVE WIDGET” on the upper right corner
- CLick the “save” button on the lower right corner to complete this step
Step 10: Configure Social Posting
This is the final stage to complete the fast start and get your account ready to start collecting reviews.
Click the “ADD” blue button to get started!

Step 11: Connect your Social Media Accounts
Facebook, Google, and X (former Twitter) are available to integrate.
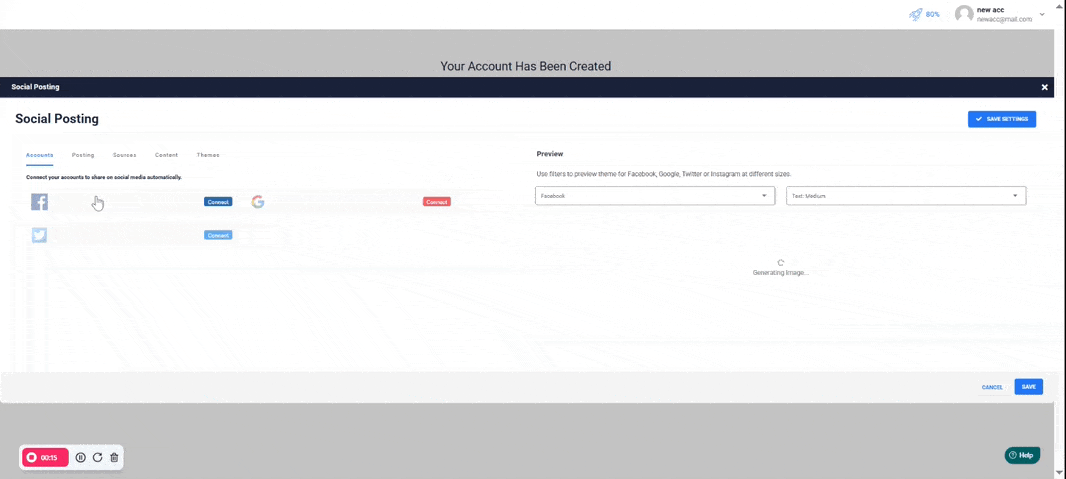
- Connect your social media platforms.
- To get started, choose your platform you want to connect to, and click the “Connect” button right next to each platform icon.
- Enter your login credentials: You’ll be redirected to each platform to authorize access
- Facebook: Connect your business page
- Google: Connect Google My Business profile
- X (formerly Twitter): Connect your business account
- Save and sync: The system will automatically connect your accounts and verify permissions
- This may take a few minutes to establish the connection
- Finish the social media setup: Once all connections are complete, move to the next tab
Step 12: Configure Posting Schedule
This is the moment to set up when and how often your reviews get posted.
- Set your posting frequency
- Click on the “Posting” tab to open the scheduling page
- Configure your posting days:
- Days of week: All days are checked by default – uncheck any days you don’t want posts
- Time of day: Options include “As soon as queued”, “spread through the day”, and specific times.
- Timezone: Verify your timezone is correct (set to America/New_York by default)
- Set daily limits:
- Limit per day: Enter 2-3 posts maximum to avoid overwhelming followers, or leave empty for no limitations.
- Long reviews: Choose “Truncate long reviews” to keep more content flowing; it is also possible to “filter out” long reviews.
- Configure review quality filters.
- Set minimum star rating:
- “Rating at least 4” = Recommended balance of quality and quantity
- “Rating at least 5” = Safer option with fewer posts
- “Rating at least 3” = More posts but includes mediocre reviews
- Set minimum star rating:
- Optional, enable auto-posting: Click the toggle switch to turn “Enable Auto Posting” ON (green)
⚠️ Auto-posting can share sarcastic/negative reviews disguised as positive ones!
Example Risk: 5-star review saying “Amazing service! Only waited 2 hours past my appointment. Staff was so friendly – barely looked up from their phones!”
⚠️ Safety Recommendations:
- Start with manual approval first
- Use “VIEW QUEUE” to review posts before they go live
- Consider “5 stars only” initially for safety
- Set up email notifications for new posts
- Once you are satisfied with the settings, click “Save Settings” to apply your configuration
Step 11: Configure Review Sources
This is where you select which review platforms to pull content from for your social media posts.

- Select your review platforms
- Navigate to the “Sources” tab at the top of the page
- Review available platforms: The system will display the review platforms you connected in step 3.1
- Choose platforms to include:
- Check the box next to each platform you want to use for social media posts
- Verify your review sources
- Confirm correct business profiles: Make sure the URLs shown match your actual business profiles.
- Finalize source selection
- Select all desired platforms: Check the boxes for every review source you want to include
- Verify integration: The system will automatically sync reviews from the checked platforms.
- Once you’ve selected your preferred sources, proceed to the next tab
- Note: You can always return to adjust these selections later if needed
Step 12: Customize Post Content
This is where you create the text that will appear with your review images on social media.
- Create your default post text
- Navigate to the “Content” tab at the top of the page
- Write your caption text: Enter the text you want to appear with every review post in the large box, or leave the default text if you prefer.
- The system provides tokens that automatically insert review details
- [name] – Inserts the reviewer’s name
- [date] – Inserts the review date
- [rating] – Inserts the star rating
- [text] – Inserts the actual review text
Step 13: Customize Visual Themes
Choose the visual design for your social media review posts. And make sure you click the save button in the lower right corner to complete this step.

- Select your post themes
- Navigate to the “Themes” tab at the top of the page
- Choose multiple theme designs from the circular previews shown
- Select 3-5 different themes for variety (they will rotate randomly in your posts)
- Options include photo backgrounds, text-only designs, and various color schemes
- Preview and test
- Use platform dropdown: Select Facebook, Google, X, or Instagram to preview
- Adjust text size: Choose from text sizing options in the dropdown
- Live preview: The Right panel shows exactly how posts will appear with your reviews
- Finalize and save
- Verify that themes look professional across all selected platforms
- Click “SAVE SETTINGS” for changes to implement
Need help? Write us at support@reviewgrower.com
